
Caramel Stuffed Chocolate Cookies
Caramel Stuffed Chocolate Cookies make a great Santa cookie. They are tasty, fun, and help make the holidays bright. You will be anxious to sink your teeth into these chocolatey cookies with a fun caramel surprise.
 Don’t you just love the holiday season? There is just something so fun about decorating for the holidays and baking delicious goodies to share with family and friends, and to leave out for Santa. Especially when you leave out Caramel Stuffed Chocolate cookies.
Today I wanted to share a fun tutorial for holiday decorating, a “snowball” craft and a totally tasty recipe for caramel stuffed chocolate cookies, perfect for leaving for Santa.

I realize there are so many ways to make the holidays merry and bright, which is why I wanted to share my experience with American Greetings. They have an incredible selection of greeting cards, gift wrap, tissue and bags to help you connect with family, friends, neighbors and co-workers this holiday season. Plus the low prices found at Walmart mean you can do this affordably. I love this. I already spend so much during the holiday season, it is nice to save where I can. These no bake cookies are another cookie recipe that Santa loves.
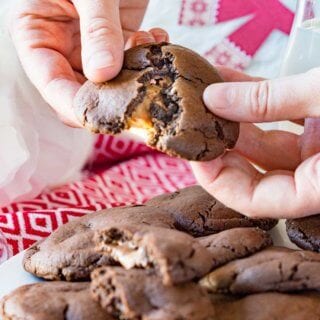
Let’s talk about these Caramel Stuffed Chocolate Cookies for a minute. They are rich and chocolate-y, and stuffed with caramel, I know a Santa or two that would love eating them on Christmas eve.
Chocolate + Caramel is always a winning combination, and one that is universally loved, making these an insanely good neighbor gift and treat. You can use them to “Elf” your neighbors with the help of the free Elfing printable you can include with your treat bag with instructions, a poem and small sign for people to hang on their door after they’ve been “Elfed”. It is such a fun way to get in the holiday spirit of giving.

Once you are in the holiday spirit of giving, get your house in the holiday mode with a card banner! This card banner is a fun and festive way to display holiday cards, either in a window, on a door, or on your mantle! I know at Christmas I always get a lot of lovely cards from family and friends, and I want to be able to see them. Not only are they memorable and fun, but sentimental, and a great addition to your decor. So why not make a card banner? Especially when it turns out this cute.

Card Banner Tutorial
Supplies Needed
- 10-15 cards
- 5 ft red curling ribbon
- Painter’s tape Painter’s Tape
- Paper Clips Paper Clips
- Extras for decorating banner!
o Extras: Small bulbs with curling ribbon inside and coffee filter snow balls.

Directions:
- Using the painter’s tape, string your curling ribbon in an arc across your window, door, or fireplace.
- Using paperclips, secure cards to the ribbon one at a time. You can also tie a knot where you want the cards to be in order to help secure the paper clips. Or just open the cards and fold them over the ribbon, depending on the orientation.
- After your cards are in place, hang decorative bulbs, and coffee filter snowballs from the ribbon for more decorative fun.
Tutorial for Coffee Filter Snowballs
Supplies:
- Coffee filters, 7 per snowball Coffee Filters
- Stapler with staples Stapler with staples
- Curling ribbon
Directions:
- Take 6-7 coffee filters, and lay them out flat, stacked on top of each other.
- Fold them in half.
- Fold them in half again
- Staple the corner together.
- Take a 1-2 ft piece of red curling ribbon and staple it to the corner.
- Slowly peel back each layer to make a snowball!
- Hang on your card banner using the curling ribbon.
I can’t wait to celebrate Christmas, and get my bake on, make memories with my kids, and just have a great time. If you are looking for more fun ideas for how you can make Christmas special with your family, check out this 12 Days of Christmas idea with Blue Mountain.
 Supplies for baking cookies
- Silicone Baking Mat
- Cookie Scoop
- Non Stick Cooling Rack
Caramel Stuffed Chocolate Cookies
Decadent chocolate cookies stuffed with caramel! Perfect for Holiday gifting or a treat for Santa.Print Pin RateServings: 36 cookiesIngredients
- 1 cup granulated sugar
- 1 cup brown sugar
- 1 cup butter
- 2 eggs eggs
- 1 tsp vanilla
- 2 1/2 cups flour
- 3/4 cup cocoa
- 1 teaspoon baking soda
- 1 teaspoon salt
- 40 candies Chocolate caramel candies or caramels, unwrapped
Instructions
- Preheat oven to 375 degrees
- In a large mixing bowl, and using a hand mixer, cream together granulated sugar, brown sugar, butter and eggs.
- Then add 1 tsp vanilla and mix togehter.
- Then in the same bowl, add the following dry ingredients of flour, cocoa, baking soda, and salt.
- Mix thoroughly
- Unwrap about 40 chocolate covered caramel candies
- Scoop dough balls, make an indent with your thumb and place the caramel candy in the middle. Roll the dough so no candy is showing.
- Bake 375° for 8 to 9 minutes
- Cool on Non Stick Cooling Rack!
Our recipe card software calculates these nutrition facts based on averages for the above ingredients, different brands, and quality of produce/meats may have different nutritional information, always calculate your own based on the specific products you use in order to achieve accurate macros for this recipe.
Tried this recipe?Mention @ezpzmealz or tag #ezpzmealz! Want to use this recipe in a meal plan?Try PrePear, my FREE Meal Planning App that allows you to save your recipes, plan meals, shop for groceries, and cook simply in one place. Join Here!
Other holiday cookies you might enjoy:
Pin to your Christmas Cookies board on Pinterest:


Ann @ Bake du Jour says
These look amazing! I bet they would go really well with a nice glass of milk. 🙂
Rachael says
Thank you! They are absolutely delicious.
Patricia Lynn Ewing says
I want to please have the recipe for Caramel stuffed Chocolate Cookies
Rachael says
Well you came to the right place, just scroll down and you will find the recipe in the post. It has a print button too, so you can print just the recipe out, and not the whole post.
Natalie says
Love the gooey middle!! Caramel is so yummy, especially in the middle of a delicious cookie!
Melissa says
Yummy – these cookie were so delicious! My family ate them up, everyone love them!
Patti Glaser says
Hello,
Did you use unsweetened cocoa powder in the caramel-stuffed chocolate cookies?
Rachael says
Yes, unsweetened cocoa powder