
Garlic Bread Twists Recipe:
This easy to make garlic bread recipe makes 20-30 buttery, garlicky, and absolutely delicious garlic bread twists in under and hour. Ready to learn how to make garlic bread easy?
This garlic bread recipe is a twist on a classic recipe. These easy to make garlic bread twists are the perfect addition to any meal. Take your dinner to the next level by adding these to your next meal.
Serve with Carbonara, White Cheddar Baked Macaroni and Cheese, or Baked Spaghetti for an awesome meal.

Easy Garlic Bread
We love garlic bread, especially this Worlds Best Cheesy Garlic Bread Recipe.
Garlic Bread Twists: You guys there is nothing quite like fresh baked bread or breadsticks. But why do they take so darn long to make? Breadsticks are one of my favorite things with a bowl of soup or a big fresh salad. But I never want to put in the time.
But then I think about soft, garlicky breadsticks. The buttery topping! And then I am like, “Ok…worth it!”
Because I never wanted to take the time, I decided it was about time I figured out a fast easy garlic bread recipe that would take under an hour. That way, when I send my kids out to play, and they come in hungry, they don’t have to wait forever to eat! These bread sticks are the fastest, easiest bread ever, and taste amazing to boot! We make garlic bread all the time now! And so far no one is complaining.

Garlic Bread Twist Variations:
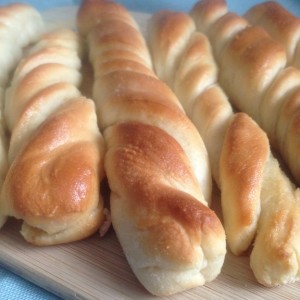
Not only are Garlic Bread Twists a beautiful golden brown, but they are light, fluffy, and so good. I could fill up on these alone, but love dipping them into a bowl of soup, or a nice pasta sauce. Honestly, I love them just as the recipe is written. But sometimes, it is fun to mix up the filling.
- Mix some parmesan cheese into the center garlic mixture.
- Skip the garlic salt and add cinnamon and sugar instead to make them cinnamon twists.
- Try some fresh herbs and butter. I love basil and garlic.

How to make Homemade Garlic Bread
Garlic Bread Twists go well with soup, pasta, or just on their own. And if you can’t master the twist, don’t worry, they are great just rolled as well. I just like the twist because it means a little filling in every bite, and some extra texture. That extra texture is super nice. I love when you get that nice golden brown with just a little crunchy crispiness. Oh so good.
And when you use a silicone butter brush (not even sure what it is called), and brush melted butter on top…oh em ghee!

Tools Used to Make Garlic Bread Twists:
- Kitchen Aid Mixer: I love using my kitchen aid for these breadsticks because it keeps things simple. Toss the ingredients in and let it knead.
- Kneading Hook: You can knead by hand, but I figure using the mixer is even easier.
- Pizza Cutter: I love using a pizza cutter to quickly cut out the breadsticks. It is smooth and simple.
- Silicone Baking Mat: If I could recommend one thing you purchase for your kitchen it would be these silicone mats! They are the best. They make baking so much easier, and nothing sticks.
- Pastry Brush: Brush on that butter and shake on some garlic salt!
Other great recipes:
- Cheesy Garlic Pull-It Bread
- No Knead Dinner Rolls
- Simple Quick Dinner Rolls
- Cheese Stuffed Garlic Rolls
Garlic Bread Twists Recipe
Ingredients
- 3 cups warm water
- 4 Tbs white sugar
- 2 Tbs yeast
- 1 tsp butter flavoring optional
- 6.5 cups flour
- 1 tsp salt
- 1 Tbs Garlic salt Or to preference, divided
- 1/2 cup butter melted
Instructions
- In a large mixing bowl, add warm water, and then add yeast and sugar to it. Be sure the water is not too hot or it will kill your yeast. Stir it and set it aside.
- Let the yeast mixture sit about 5 minutes. Watch for yeast to foam, if it does not foam, your yeast is dead, your water is too hot, or something went wrong, so toss it out and start again with water that is warm to the touch but not burning.
- Once yeast foams, add in butter flavoring to the mixing bow (Optional: Only do this step if you are using it, don't worry, it is good without it too).
- Then using a stand mixer, or hand mixer, on low speed, gradually stir in the flour and salt. I used a kitchen aid, and a bread hook, and it worked well. Add 1/2 a cup at a time until fully incorporated.
- Continue to mix, kneading the dough for 5 minutes or so, until the dough sticks to your fingers when you touch it, but your finger comes away clean when you pull it. If it is still too sticky, add a little more flour and keep trying until you get a dough that is the right consistency. Once well mixed, let it sit, covered for about 10 minutes to allow dough to rise.
- While waiting for dough to rise a little (during the 10 minutes), melt your butter in the microwave in 30 second intervals until melted through.
- Roll out dough into a rectangle shape.
- Brush with butter, and sprinkle on the garlic salt. Just a sprinkle is good, as you do not want it to be too salty, so adjust to your preference.
- Once brushed and sprinkled, fold dough in half so that the butter mixture is in the center.
- Use a pizza cutter to cut 1 inch strips of the dough.
- Take each strip, and twist them to form garlic bread twists. (See video)
- Put twists on an ungreased baking sheet (should fill 2 sheets, making 24 bread twists)
- Cover breadsticks and let rise for 20 minutes.
- Turn on oven and preheat to 400 while bread is rising.
- Bake at 400 for 18-20 minutes.
- Remove from oven, brush on melted butter, and sprinkle on a little more garlic salt
- Enjoy
Notes
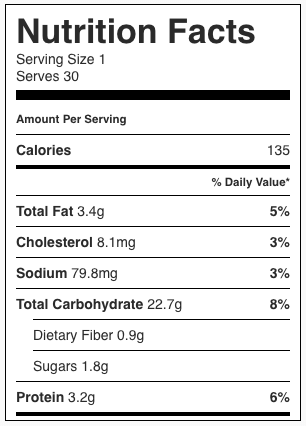
Nutrition
Our recipe card software calculates these nutrition facts based on averages for the above ingredients, different brands, and quality of produce/meats may have different nutritional information, always calculate your own based on the specific products you use in order to achieve accurate macros for this recipe.
Pin to your Bread board on Pinterest:


Amy@Little Dairy on the Prairie says
These look amazing! I’m definitely going to make these soon!
Rachael says
Amy they are also super easy, and come together fast, a huge plus for me! Hope you do, let me know what you think.
Annette Bjorkman says
I made these and they were good but severely lacking in salt in the actual dough? Is the measurement written correctly? I would make these again but at least double the salt in the actual dough.
Rachael says
Annette, I make these regularly as written. I use salted butter and a garlic salt that is very salty, so maybe we are using different brands, which is why you are feeling the lack of salt. Feel free to double the salt in the dough if you would like, and let me know how it turns out for you.
Jen says
Can these be frozen for future use? Either pre-baked or before baking?
eileen Helms says
can you make ahead and freeze this recipe?
Rosana says
Adorei a receita, obrigado , sucesso sempre!
Nirmala says
Is 6.5 cups: 61/2 cups ?
Rachael says
yes. Sorry for the confusion 6 and a half cups
Joanna says
Man! These are freakin’ awesome! I found them on Pinterest, and just decided to make them tonight to bring to my boyfriend’s tomorrow to go with chicken Parmesan that I’m fixing for him. They come together super easy and I figure I can heat them up real quick while I’m baking the chicken parm. I didn’t change a thing (I just made half a recipe, since it is just the two of us). Thanks for posting this!
Rachael says
Thank you for your sweet comment! I am so glad you like them. Have a wonderful date night.
Mary Christiansen says
Going to try this..
Jess says
These look amazing! Making them ASAP!
Sue says
Self raising or plain flour?
Rachel says
I made these last night and they were awesome. Making them again tonight since we’re feeding a few extra mouths. My daughter and I didn’t notice they were to fit into 2 pans and crammed them into 1. They were still awesome and we ate them all!!
Rachael says
Oh I am so glad you enjoyed them enough to make them twice! Made my day. We make them all the time.
Carol says
Self rising flour or all purpose flour?
Rachael says
all purpose
DD says
These look wonderful! What size do I roll the rectangle? When I fold in half, do I fold lengthwise or width-wise?
JG says
I’m wondering the same thing. I’ll bake them today and see how they turn out.
Emily says
DID ANYONE ELSE WHO MADE THESE FIND THAT 6.5 CUPS OF FLOUR WAS NOT ENOUGH? MY DOUGH WAS WAY TOO SOFT AND I PUT 3 CUPS OF WATER, LIKE THE RECIPE CALLED FOR.
Rachael says
Emily, you could knead longer, or add more flour. I have made these dozens of times, so I know the recipe works as written, but I also know there are a lot of variables in baking. Good luck!
Lilia says
I’m preparing it now and I noticed the same thing, the dough is soft and sticky so I’m adding more flour :-/
Vicki says
How long do you let the mixer knead these.
Catherine says
I made them this past Sunday and they were great. I did have to add more flour when needing. I have half left over. Can I use the dough for pizza?
Rachael says
I have never tried it for pizza before, but I don’t see why not.