
Lion House Rolls
Soft, tender, and flavorful, but super easy to make, these Lion House Rolls will quickly become your go to roll recipe.
I have been on the lookout for years for a good roll recipe. I have a love affair with bread. And when I saw my friend Christy posting about these rolls, I knew I needed to make them.
And so I did, for Thanksgiving. Yep, the first time I ever made them, I made them for a Thanksgiving I was hosting. Not something I would normally recommend.
I have a recipe I already love, my Mom’s Rolls, but I wanted something that made bigger rolls, and that didn’t require shortening. And I have this simple and quick roll recipe that is SO good, but requires dough enhancer, and I don’t always have some. So I wanted a recipe I could make with what I have.
This recipe is it. I love it. Not only can you:
- Easy to make: Working with yeast can feel complicated, but there is nothing too complicated about this recipe.
- You can make it ahead: For Thanksgiving this was super nice, because I did not have time on Thanksgiving Day to be rolling out rolls, and waiting for a double rise. I loved being able to whip them up the night before, and still have them turn out amazing,
- Simple: Turns out great every time. I have since made these rolls 5-6 times in a week just to make sure the recipe is fool-proof for you guys. And I have to tell you, they turned out great every time.
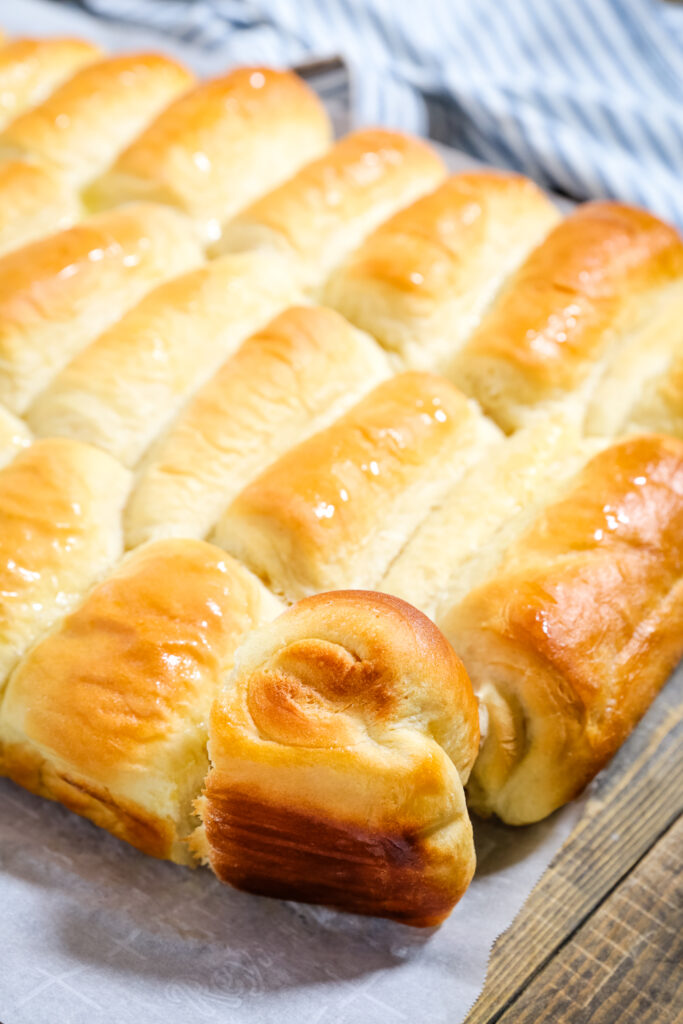
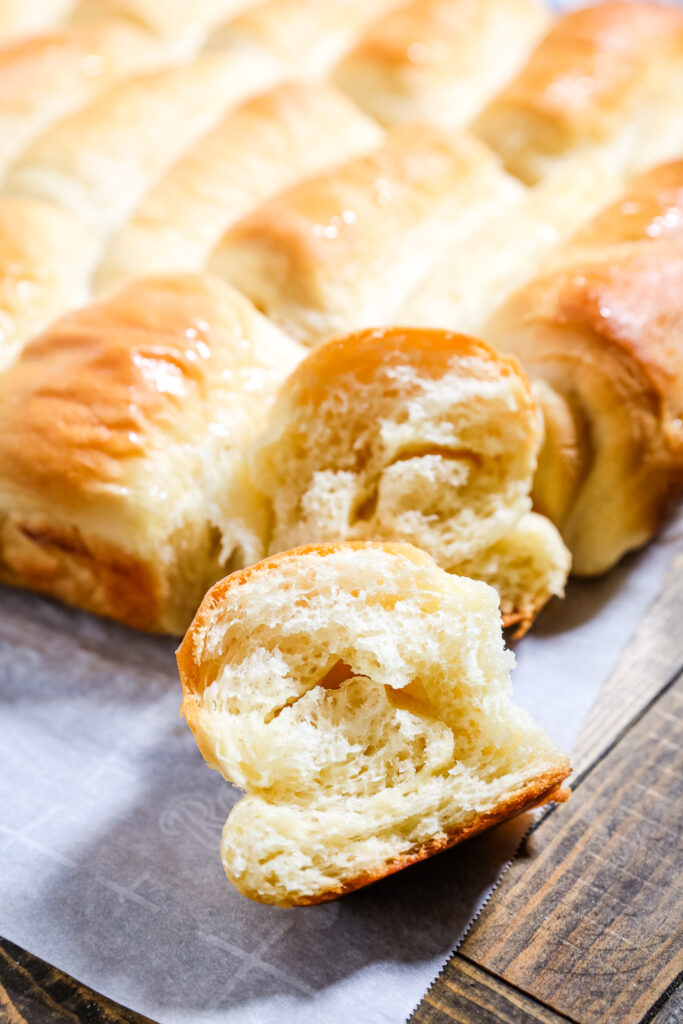
- Versatile: Roll into crescent or the traditional Lion House shape. I even made them in a dinner roll shape, and they turned out great every time. I prefer the Lion House shape, because it is perfect for sandwiches, etc. But roll them how you want.
What you need for Lion House Rolls:
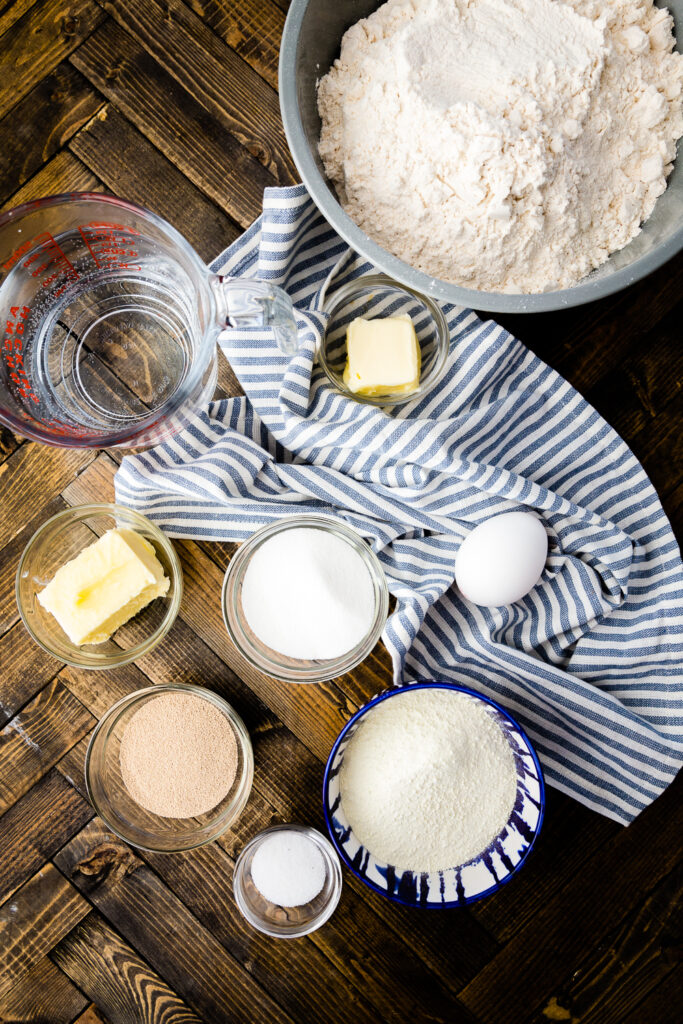
This recipe is pretty simple, with all the basic ingredients you expect for rolls, with one exception, it calls for non-fat dry milk.
Do not let this stop you from making it. You can pick it up at literally any grocery store, and a bag of it will last you a while, so you will always have it on hand when you want to make these rolls. I am so glad I didn’t let that non-traditional ingredient dissuade me.
So here is what you need:
- Water
- Non-fat dry milk
- Instant Yeast
- Sugar
- Butter
- Egg
- Flour
- Salt
Seriously basic, but somehow the combination of these ingredients in this way make for the world’s greatest rolls.
How to Make Lion House Rolls
It is seriously easy. It takes a few simple steps:
- Proof yeast.
- Mix rolls together.
- Let rise.
- Roll out and shape rolls.
- Let rise again.
- Bake.
Proofing Yeast:
Do not be intimidated by this step. Yeast scares people but it isn’t too hard to work with if you know the two common pitfalls to avoid:
- Using expired yeast. So check the label, your yeast won’t work properly if it is expired.
- Having too hot of water and killing the yeast. Aim for Luke-warm to warm water to avoid killing the yeast.
Start by getting warm water in a large liquid measuring cup. You want the water to be warm, not hot, because you do not want it to kill your yeast. If you want to get technical, use an instant read thermometer and get it around 105-110 degrees F. But honestly, Luke-warm to warm will do the trick.
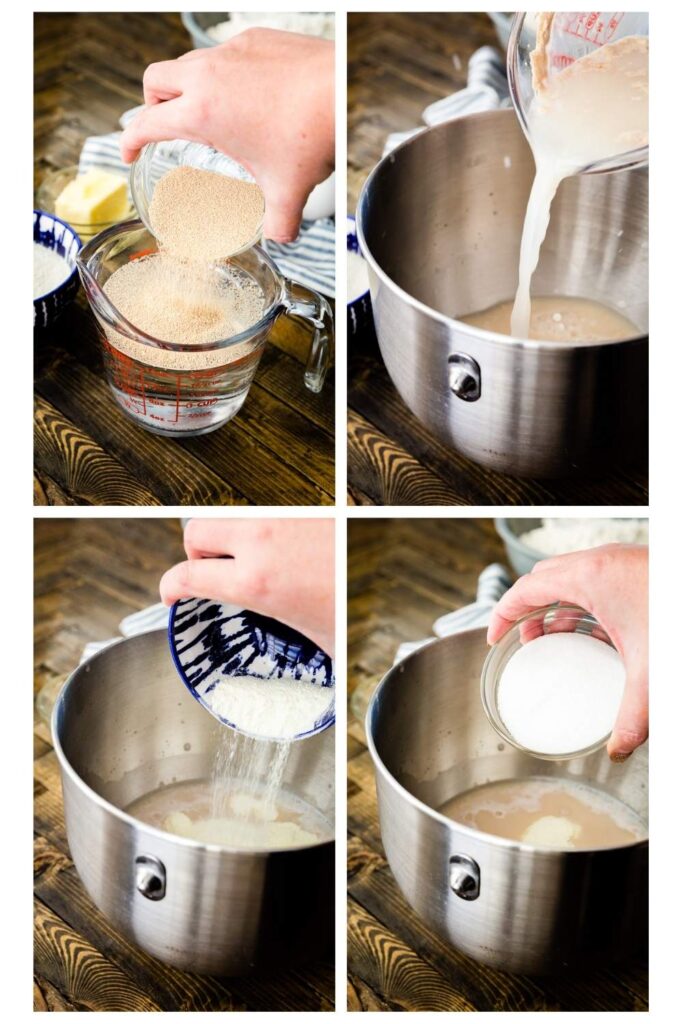
Next add in your dry milk, yeast, and sugar. And give it a quick stir. The warm water will activate the yeast, so look at it and make sure it foams. Let it sit about 5 minutes, if it doesn’t foam at this point, dump it and start again, your water was probably too hot, or your yeast is expired. The sugar helps feed the yeast too, so it could foam even faster than 5 minutes.
Once your yeast foams, transfer your mix to a mixing bowl, I use the one for my stand mixer, because I let it do all the work for these rolls.
Mix up your Rolls
Add in the egg, salt, and 2 cups of the flour.
Then using the paddle attachment, mix your dough for about 2 minutes, to incorporate everything and get the dough started.
Then add the remaining flour. It calls for an additional 5 1/2 cups. You may need a little less, or a little more. You want the dough consistency to be right. So swap out your attachment to the dough hook, and let it start to mix/knead. Add the flour a little at a time. You should notice it start to pull away from the sides of the bowl.
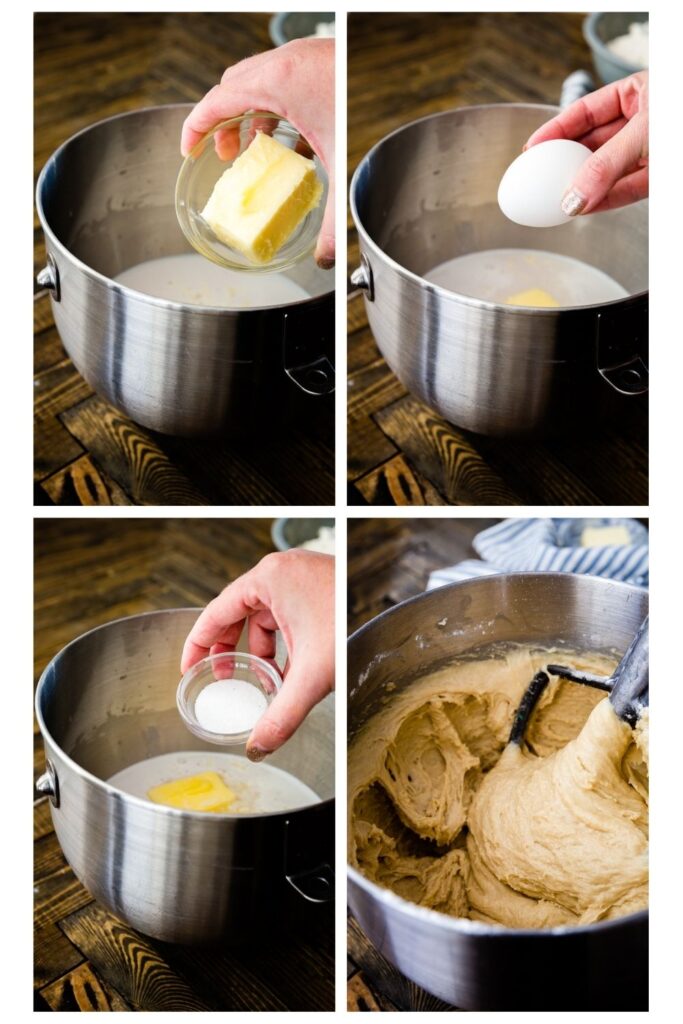
Let it mix for about 5 minutes, at this point it should be pulling away from the sids of the mixing bowl cleanly. If not, you can add a little flour, but the recipe will still work, I have made it over and over, and I can tell you the rolls still work. The structure just won’t be as strong.
Once your flour is all added and you have let it knead, use your hands to pull the dough away from the sides, and add some oil to the bowl. I like to kind of massage the dough a little, and coat it in the oil so it doesn’t stick to the bowl.

Let Dough Rise
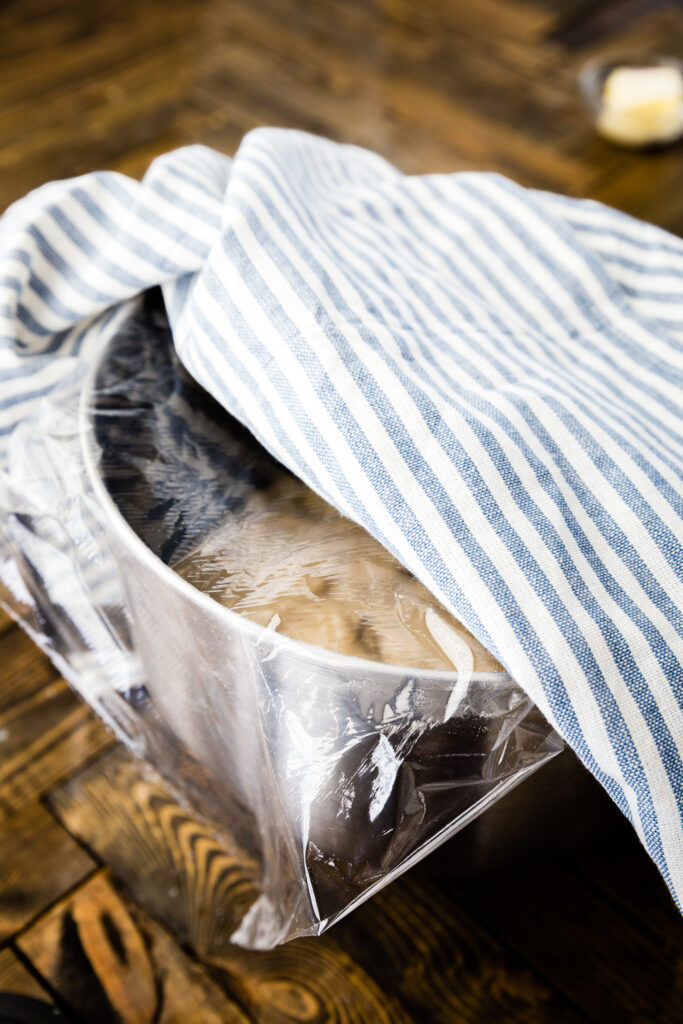
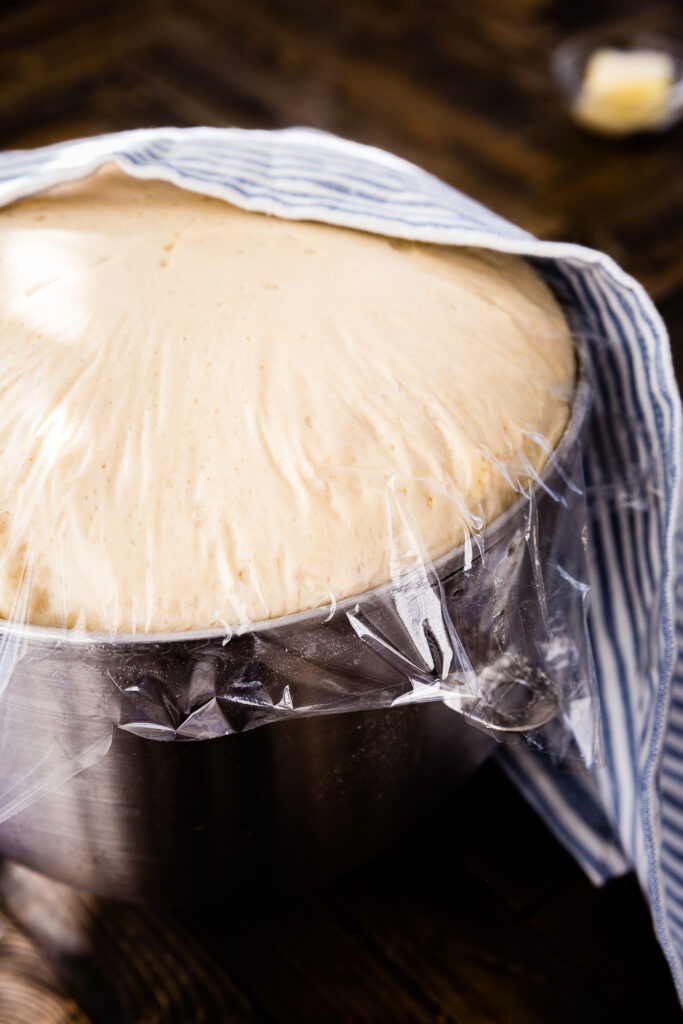
At this point, cover the dough bowl with plastic wrap, and a tea towel, and let the dough rise until double in size. This can take 1- 1 1/2 hours, depending on the temperature in your kitchen. Just keep an eye on it, I have let it over rise, and it spilled out of the bowl. But good news, the rolls still worked.
Roll Out and Shape Rolls
Once risen, it is time to roll out your dough for making your rolls.
This recipe makes 2 dozen rolls. And you cook them all on the same jelly roll sheet, or cookie sheet. I was confused by this the first time I made them, and tried to give them lots of space and their own pans. But this is a recipe where they all squish together, and make tall, fluffy, beautiful rolls.
So line a baking cookie sheet with parchment or a silicone liner, and use a floured counter or cutting board as your surface for rolling out your dough.
Flour the surface well, and use a rolling pin to roll out 1/2 the dough.
Roll it into a rectangle shape. Then use a pizza cutter to cut the sides down so it is a perfect triangle. Put the excess dough with the other half of the dough still waiting to be rolled out.
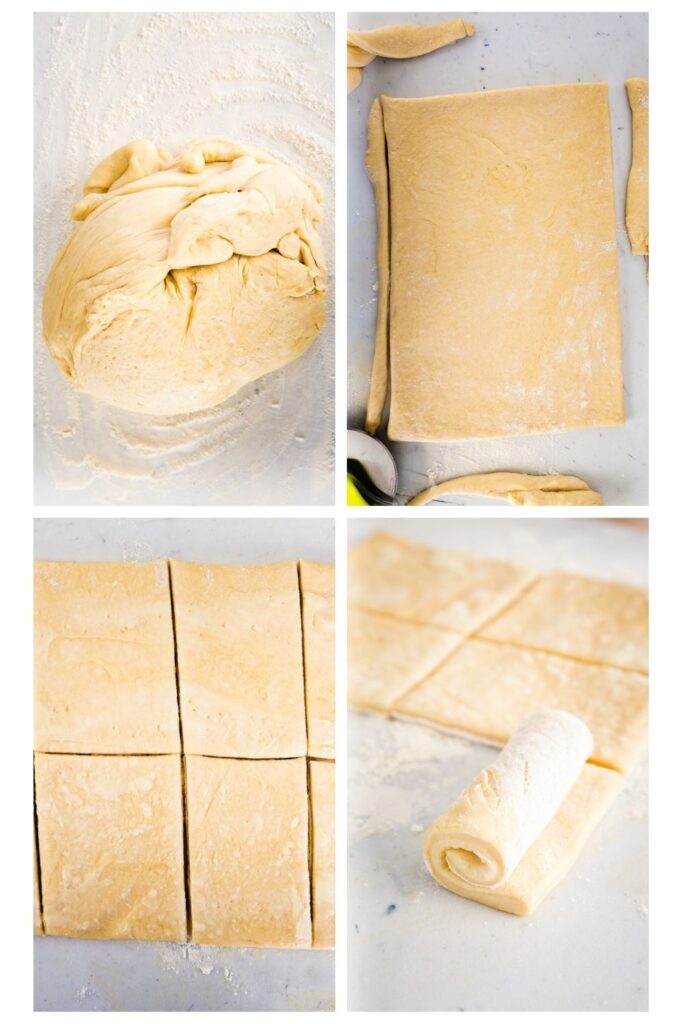
Spread butter over the dough, then use your pizza cutter to cut the dough into 8 rectangles. Each one should be about 2 inches by 4 inches in size. The dough should be about a centimeter in thickness.
Then roll each rectangle into a cylinder. Place on the baking tray, tail side down, three across (as pictured). And 8 to a row.
Even though you started with half the dough, because you cut off the edges, you end up using 1/3 of the dough. So repeat this 2 more times, until you have 24 rolls, and all the dough has been used.
Second Rise
Cover the rolls on the baking sheet, and at this point, either place in the refrigerator for up to 10 hours, leaving plenty of space so they can slow rise in the fridge over night. Or let rise on the counter until double in size.
Note: If you let them rise in the fridge for the second rise, pull them out of the fridge at least 30 minutes before you plan to bake, to allow them to continue to rise and to come to room temp.

Bake Rolls
Once rolls are double in size, it is time to bake. I suggest preheating your oven around the time you cover the rolls for the second rise, so it has plenty of time to get hot and come to temp.
Bake rolls at 400 degrees F for 20 minutes, until golden brown.
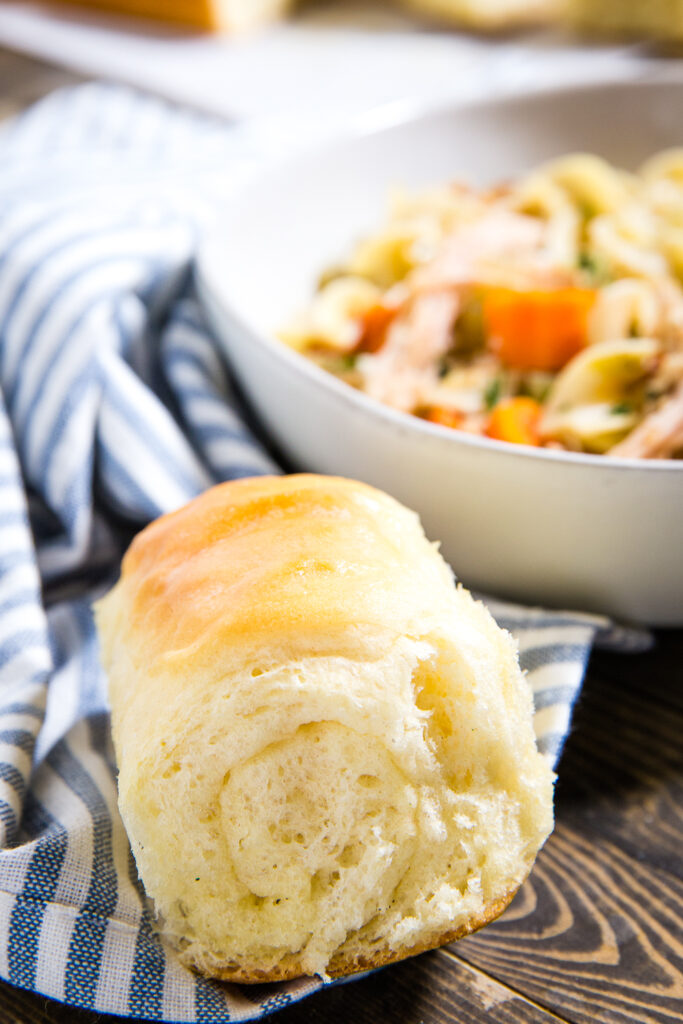
Remove from oven, and brush with melted butter. And try not to eat too many hot out of the oven. We know, it is hard!
It really is just that easy.

Getting Great Lion House Rolls, All the Tips and Tricks
Having made these rolls dozens of times now, I have come up with a list of tips and tricks to help you simplify the process.
- Use a big liquid measuring cup or the mixing bowl for a stand mixer. This recipe calls for two cups of warm water, so use a 4 cups measuring cup so you can mix all the good stuff right away in the measuring cup. I love this one from Amazon.
- Make sure your yeast foams before moving to the next step. Do not waste ingredients or time if you accidentally kill your yeast or use old yeast that isn’t working. Check it first so you can start over right away. Mix it with the warm water, and if it starts to foam, then proceed and add the dry milk, sugar, etc.
- Use a large egg. Extra large is fine, and medium is fine too. But, the size of the egg will impact how much flour you need to get the right consistency for your dough. So use a large egg. Or pay attention. And adjust your flour as needed.
- Silicone baking mats make for easy cleanup, or parchment.
- When brushing the rolls with butter, after they come out of the oven, you can either melt butter and use a silicone pastry brush to slather in butter, or simply peel the wrapper off a stick of a butter, and run the whole stick over the rolls while they are still hot.
- If storing for later, let rolls cool completely before bagging, as the condensation will make them soggy otherwise.
Prep Ahead and Storage
One of the nice things about this recipe is that, unlike many other roll recipes, this one can be made ahead of time.
Prep and Refrigerate
To prepare a day ahead of time, simply prepare the rolls up to the point where you have them rolled out and shaped. Then cover with plastic wrap so they won’t dry out, and place in the refrigerator. Do not let them rise the second time before refrigerating.
Then to bake, remove from fridge, let rise until doubled, and bake as normal.
Prep and Freeze
To prepare way ahead, and have ready to go like you would a Rhodes roll, or other freezer roll, mix as usual, but double the yeast, and prepare to the stage where you roll the rolls out and shape them. Then place them with space between on a baking sheet, and put in freezer. Do not let them rise a second time. Freeze until hard, then remove from baking sheet, and store in an airtight container or freezer bag.
When ready to prepare, remove desired number of rolls from the bag, and place on a parchment lined baking sheet. Let rise until double in size (about 4 hours if from frozen), then bake as normal. They can store in the freezer about 3 weeks before you need to use them.
Storage
These rolls freeze really nicely, either in dough form (see above), or after being baked.
To freeze after rolls are baked, simply let cool completely then remove from tray to a freezer bag. And Freeze.
When ready to eat, remove from bag to a tray, defrost. Then warm in oven for 5-10 minutes to brown top and make sure they aren’t soggy.
Serve with:
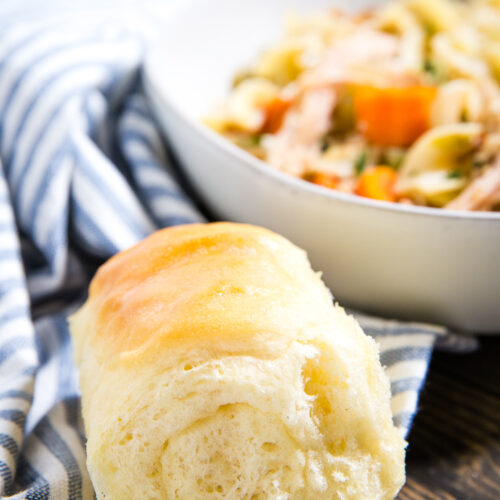
These rolls are the ultimate in easy to make rolls, so you can literally serve them any night of the week. I love having these rolls with:
Other Roll Recipes
Lion House Rolls
Ingredients
- 2 cups warm water
- 2/3 cup instant nonfat dry milk
- 2 Tablespoons active dry yeast
- 1/4 cup granulated white sugar
- 2 teaspoons salt
- 1/2 cup butter divided softened (1/3 cup for roll mix, remaining butter to brush on top)
- 1 large egg
- 5 to 5 1/2 cups all-purpose flour or bread flour
Instructions
- In the large bowl of an electric mixer or large liquid measuring cup, combine the warm water and the yeast, watch for 1 minute, and if it starts to dissolve and foam it is good, continue making the rolls.
- Add the instant milk, and sugar to the yeast mixture while the water is still warm. Stir well.
- Let the yeast proof for a couple of minutes. When foamy, continue.
- Add yeast mixture to mixing bowl if not already in there, then add salt, 1/3 cup softened butter, egg and 2 cups of the all-purpose flour.
- Mix on low speed with paddle attachment until ingredients are wet, then turn mixer up to a medium speed and mix for 2 minutes.
- Stop the mixer and add 3 more cups of flour (for 5 cups total) and mix on low speed until the ingredients are wet, then turn mixer on medium speed for 2 minutes to knead.
- Add remaining 1/2 cup of flour and mix again. At this point your dough should be soft, but not too sticky, or too stiff. It should pull away from the sides of the bowl pretty cleanly.
- Let mix about 3 additional minutes.
- Now, turn off mixer, scrape dough off attachment, and off sides of the bowl, toward the middle. Pour about 1 tablespoon of vegetable oil down the sides of the bowl, and turn the dough over to coat it in the oil.
- Leave in bowl, cover with plastic wrap and a tea towel.
- Let dough rise in a warm place until double in size (approximately one hour depending on your kitchen and how warm it is).
- Once dough is risen, sprinkle a cutting board or counter with enough flour you can work with the dough easily (1/2 cup or less usually). And place the dough on the flour.
- Divide dough into two portions, with the first half slightly smaller than the second half.
- Roll the first piece into a rectangle about 11X14 inches and about 1/4 inch thick. Use a pizza cutter to cut the edges so it is all even, add the extra dough to the other half of the dough.
- Melt the remaining butter, and brush 1/3 of it over the dough.
- Then cut the rectangle of dough into 8 equal sized rectangles, which will each be slightly smaller than a dollar bill.
- Roll each piece into the lion house shape (see images), and place on a parchment lined baking sheet, with the tail down, and the end of the roll touching the pan.
- Repeat process, divide dough in half again, but this time, the piece you will work with is the slightly larger half.
- Roll out, cut off excess dough, add to remaining portion of dough. Brush with butter. Roll out, and place on the same tray.
- Do this one last time, but incorporate all the dough, so you have none left over.
- You should have 24 rolls on 1 baking sheet, 3 rows of 8.
- Cover with a kitchen towel so they don't dry out, and let them rise.
- Place in a warm place to rise until the rolls are double in size (approx. 1 hour).
- During the second rise, preheat oven to 375-degrees F
- Bake after second rise in 375 F oven for 15-20 minutes or until they are lightly browned on top.
- Brush with melted salted butter while hot.
Notes
Be careful not to kill your yeast. Getting the water temperature right is how you activate the yeast without killing it. Try for about 110-115 degrees F, or luke warm, Like baby bath water. Warm, but not hot.
If your yeast does not foam, your yeast is not activated or you killed it. Start over before wasting your ingredients on the rest of the rolls.
You can freeze shaped rolls for later use. To do so: Double amount of yeast, and prepare rolls as stated until rolled out. Then place on a baking sheet, and immediately freeze. Once frozen solid, remove from the pan, and place in a zip top freezer bag. Remove excess air, and keep frozen until ready to use. Then simply pull out, place on sheet, and let rise until double (takes longer from frozen, 2-4 hours), and bake as stated.
Rolls can be frozen for 3 weeks.
Watch your rolls, if they rise too long, the texture is not great. Recipe adapted slightly from KSL.com and the Lion House Cookbook
Our recipe card software calculates these nutrition facts based on averages for the above ingredients, different brands, and quality of produce/meats may have different nutritional information, always calculate your own based on the specific products you use in order to achieve accurate macros for this recipe.
Pin to your Roll board on Pinterest:


Leave a Reply