
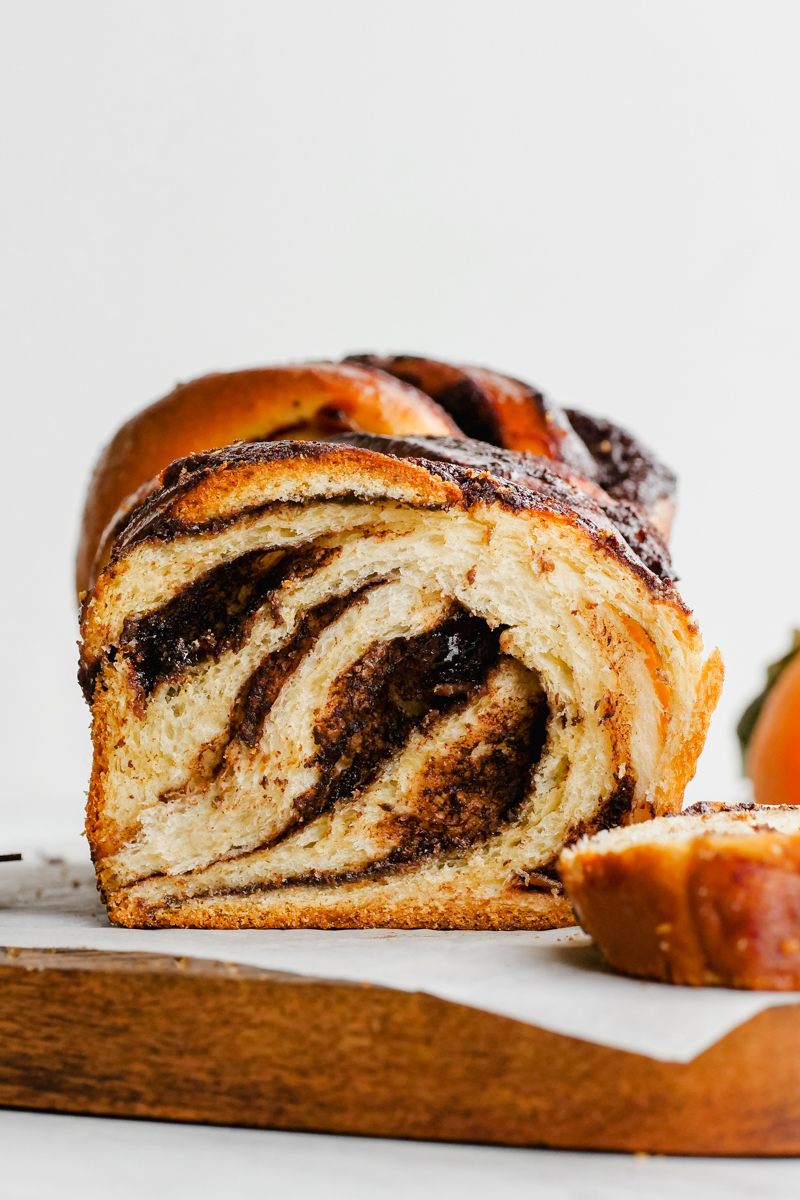
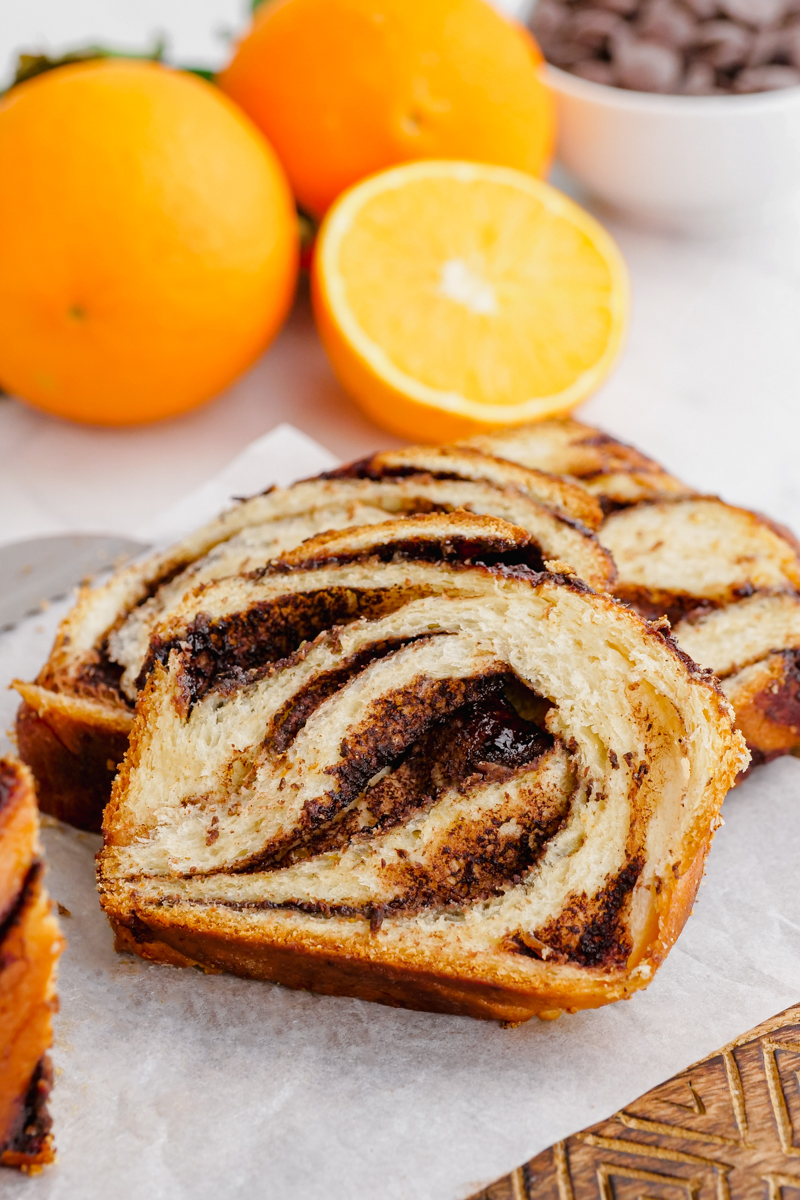
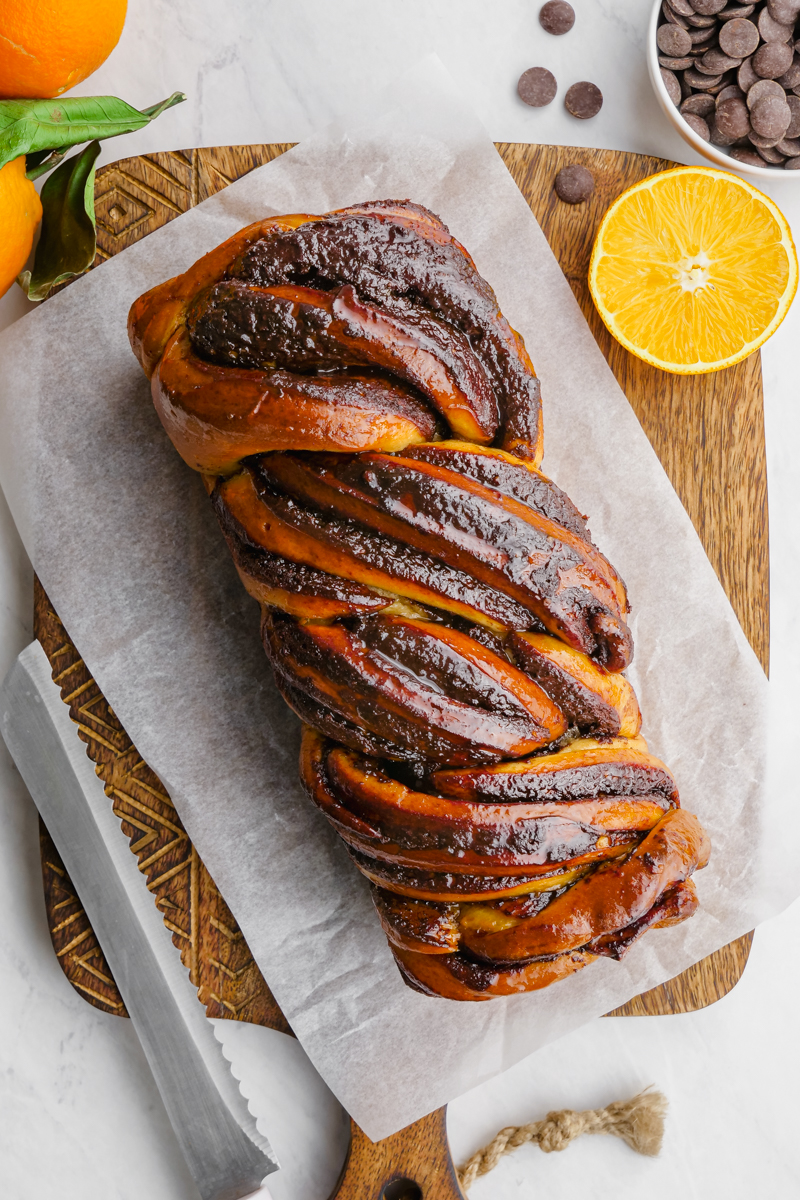
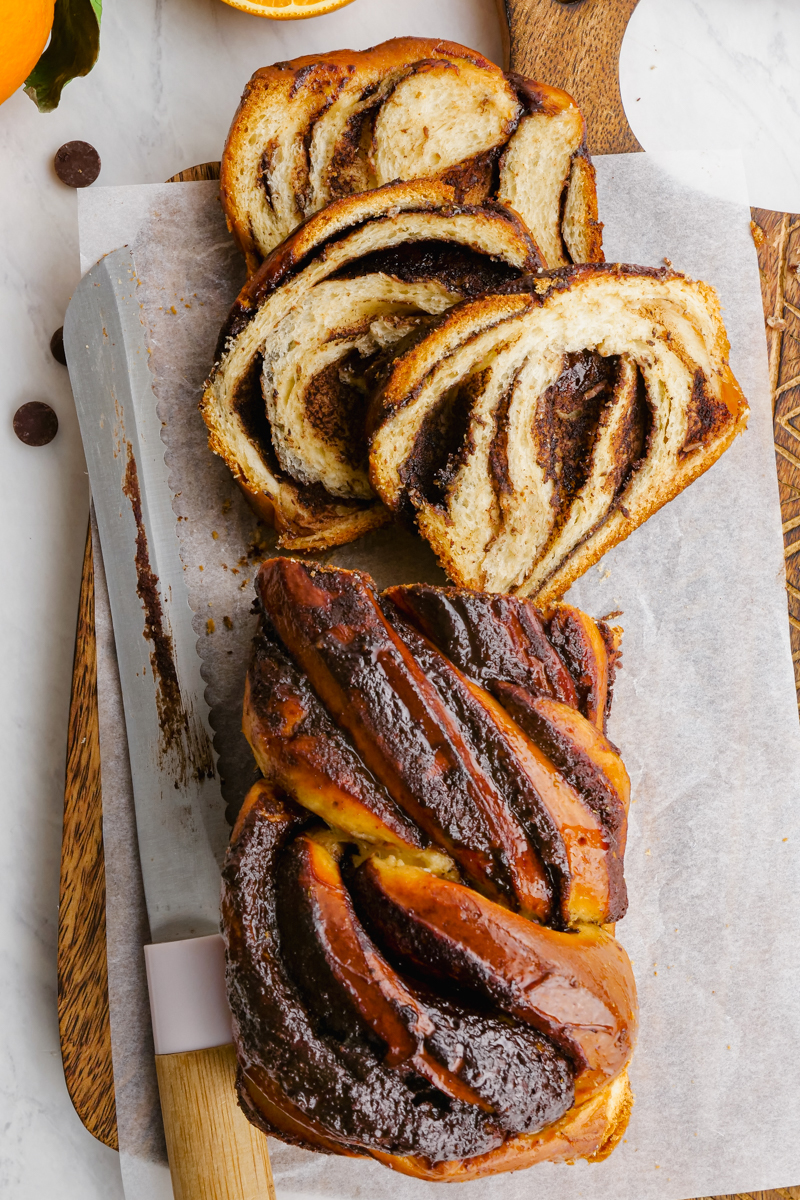
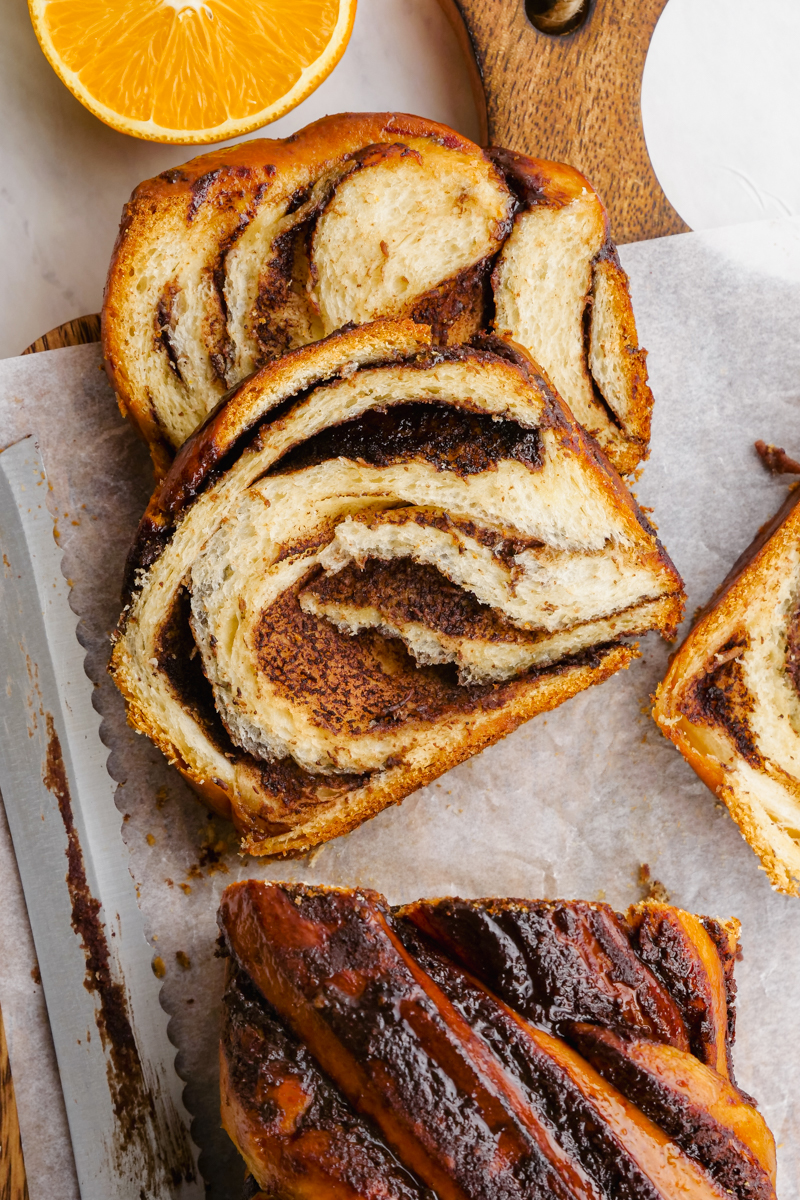
Chocolate Babka
Thick, decadent sweet bread with swirls of gooey chocolate goodness and topped with a sinfully sweet, easy to make, orange glaze. This Chocolate Babka recipe is a universal treat that makes a great home cooked dessert or delicious breakfast dish.
This brioche like bread is as beautiful as it is delicious, and it makes for an excellent food gift. So if you find yourself wanting to bake, want to pretend you just stopped at a bakery in an Israeli Market, or just want something amazing, this is the recipe for you.
Eat this Chocolate Babka on its own or use it to make a delectable bread pudding or French toast. This Babka recipe will become a clutch treat in your home.
What Is Babka?
Don’t worry if you have never heard of Babka before. It isn’t a traditional American dish. It is a sweet bread, like a brioche, that is swirled with chocolate and braided and baked, so it looks absolutely stunning, and tastes incredible.
I had it in Israel during my trip with VibeIsrael, from Lehamim bakery, and was hooked. So I knew I had to figure out how to make it.
Read about all the amazing food I ate in Israel here.
Not only have I tested this recipe and made it enough times to make it easy for you, but I am sharing all my tips for perfect Babka below!
Where Did Babka Originate?
It originated from the European region, more specifically from the areas of Poland and Ukraine. Babka comes from the word babcia. Haven’t heard of that word? Don’t feel bad. Neither had I.
Babcia is from the Slavic language and it means grandmother.
So what is Babka exactly? One of the best sweet breads you can have.
Babka: A Polish, Jewish sweet bread made with yeast that has signature swirls of chocolate filling or cinnamon all throughout the loaf of bread. Additionally, the top of the bread usually has some sort of glaze or streusel like topping.
For this recipe I chose an orange glaze, but sometimes the glaze is a simple as water and powdered sugar or a chocolate syrup glaze.
What You Need To Make Babka:
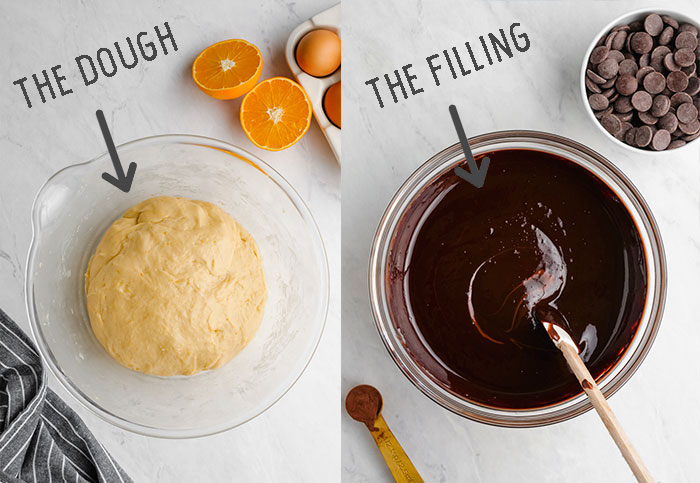
Although this dish may be new to you, the ingredients will not be. So don’t be intimidated. I know it looks like a lot of steps, but that is mostly because I wanted to be super thorough so you could achieve success. It is basically made up of three parts:
- A bread dough.
- A chocolate filling.
- An orange glaze.
You are going to have a lot of fun making and eating this sweet bread.
You will need some basic ingredients for the dough, chocolate filling, and syrup or glaze.
Dough Ingredients:
- Flour
- Sugar
- Yeast
- Orange and Lemon Zest (optional, but adds flavor)
- Eggs
- Milk
- Unsalted Butter
As you can see it is all the basic players in any type of dough recipe, from pizza dough to dinner rolls. The milk makes it extra tender, while adding flavor, and the zest just enhances the overall flavor of the bread.
Chocolate Filling:
- Powdered Sugar
- Unsweetened Cocoa Powder
- Melted Dark Chocolate
- Unsalted Butter (melted)
Again, nothing too hard to come by. My favorite kind of dark chocolate to use are these wafers by Ghirardelli, as they melt quickly and easily.
Sugar Syrup:
- Orange Juice
- Granulated Sugar
No crazy hard to find ingredients for this recipe. You’ve got this.
How To Make Chocolate Babka
Let’s take a look at how to make this amazing bread. For full instructions see the recipe card below.
- Make The Dough
- Use a stand mixer with a dough hook: While this is not absolutely necessary, the babka is easier to make if you use a stand mixer. You want to make sure you knead it for a full ten minutes to make it smooth, elastic, and shiny, and this can be very tiresome by hand.
- Use all-purpose flour. Measure carefully. Then combine with sugar, yeast, and zest. Use 530 grams or 18.7oz of all-purpose flour. The way you scoop it can impact the density of the flour and therefore how much you get, so weighing the flour is a good idea.
- Add wet ingredients, a little at a time. This is done at a medium speed, and you want to mix until incorporated.
- Add Butter! Everything is better with butter, and you want to mix yours in. This is like a brioche, so while you don’t cut the butter in, you do want to add it a little at a time so it is evenly dispersed throughout the dough.
- Knead. Do this at a low speed so as not to tear the gluten chains in the dough, and do it until the dough is elastic and pulls away from the sides of the bowl cleanly.
- Let Slow Rise. Place in a greased bowl in the refrigerator, covered for 8-12 hours to allow to slow rise. This will also make the dough much easier to work with.
- Make The Filling
- Melt Chocolate: My favorite easy way to do this is in the microwave. You can use a double broiler if you wish. The trick to melting chocolate in the microwave is chopping the chocolate into fine, even sized pieces and heat in 20 second intervals and stirring between. Not longer, or it can cause the chocolate to burn.
- Whisk in the rest. Once the chocolate is melted, whisk together powdered sugar and cocoa powder, then combine with the melted chocolate, and butter until you have a spreadable paste. Then add the zest.
- Let Cool A Little: You want it to be warm and spreadable, but not so hot that it melts the butter in your dough.
- Shape the Dough/Assemble:
- Divide dough in half: This recipe makes two loaves!
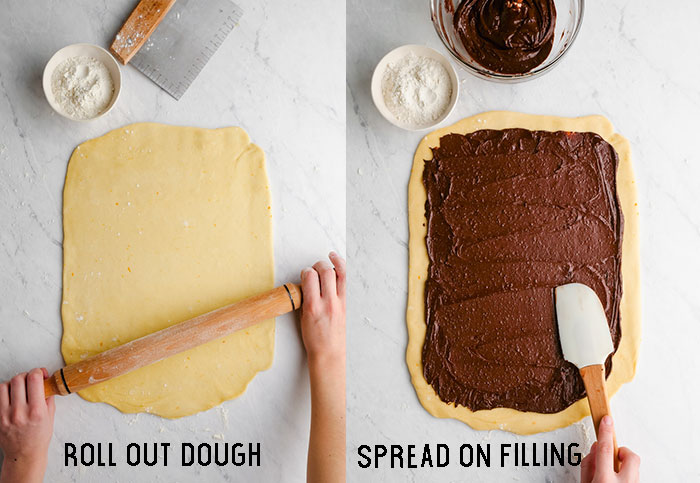
- Roll out the dough: Lightly flour a surface to roll out the dough on, then roll the dough into a rectangle measuring 15×11 inches.
- Spread the filling over the top: Use a spatula to spread half of the chocolate mixture over the rectangle of dough, leaving a ¾ inch border on all sides.
- Roll into a log: Use both hands to roll the dough into a log, starting with the long side. Once rolled, press the seam to seal it to the roll. Use your hands to even out the ends and press them into shape.
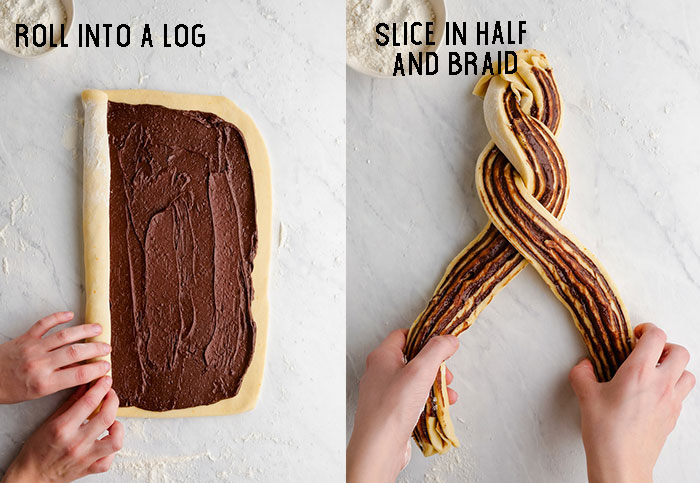
- Cut the log: Use a sharp knife to cut the roll down the center lengthwise, dividing the log into two long even halves. You should be able to see the layers of the dough and filling.
- Braid the dough: Take the two pieces and braid them together. More instructions for how to do this below.
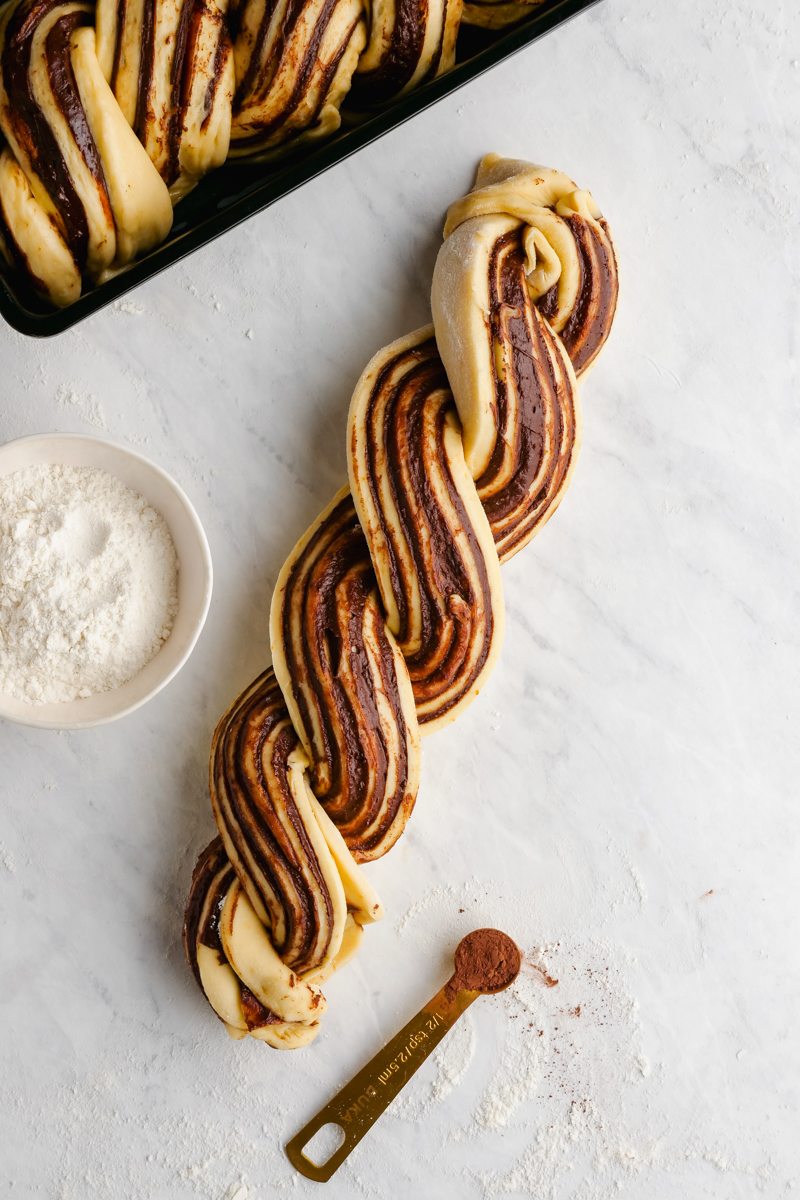
- Place in Prepared Loaf Pan: Prepare a loaf pan by spraying it with non-stick spray and lining it with parchment.
- Let rise: Cover the pan loosely with plastic wrap and leave to rise in a warm place for 1 to 1½ hours.
- Repeat: This recipe makes 2 loaves.
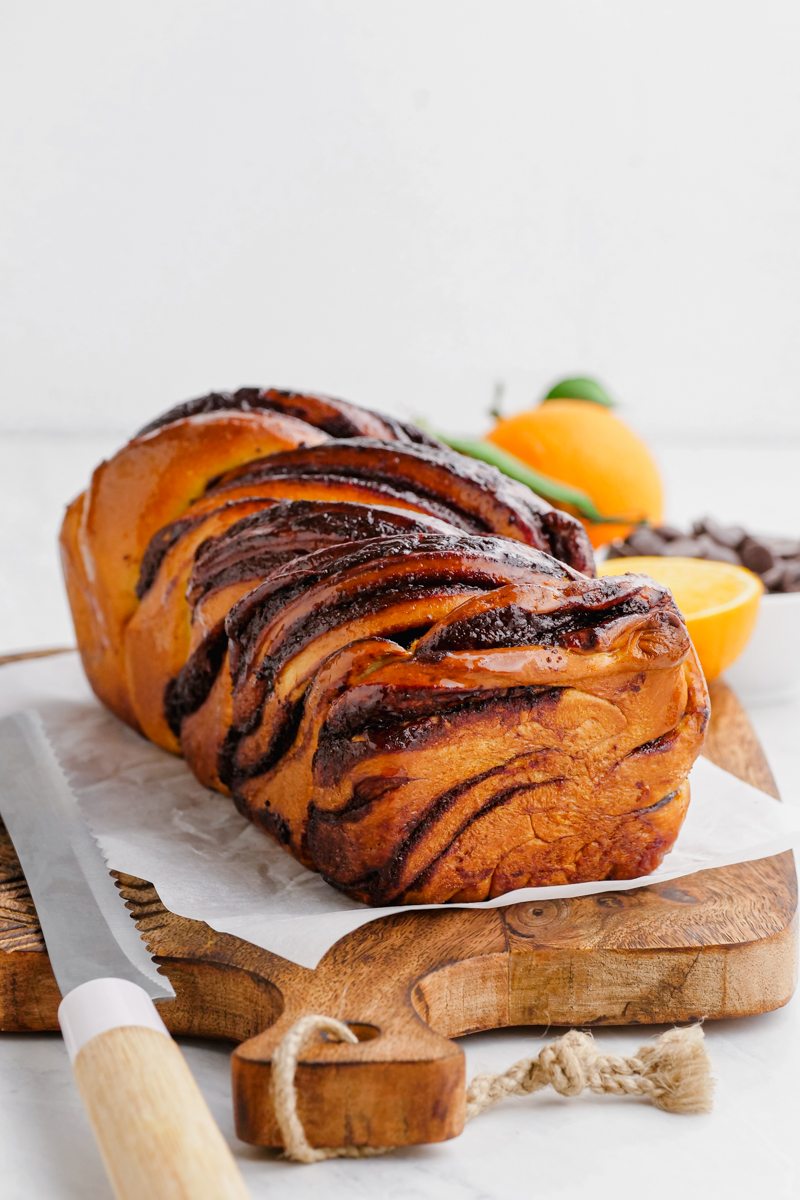
4. Bake And Glaze:
-
Preheat oven: Heat to 375°F with rack in the middle of the oven.
- Bake: 25-30 minutes.
-
Make Glaze: heat orange juice in a small saucepan over medium heat, and stir in sugar. Bring to a boil, and stir continuously until sugar dissolves.
- Glaze: As soon as the loaves of bread are removed from the oven, brush them with the syrup.
- Cool: Let pans cool completely before removing from pan and serving.
How to Braid Babka:
The beautiful braid with the exposed filling is half of the appeal of this beautiful Babka. Here is how to braid it:
- Slice your rolled log in half so you have two long pieces.
- Set cut sides facing up.
- Gently pinch one end of each piece together.
- Twist the two pieces around each other, so you end up with a twist with the chocolate side exposed. While twisting, be careful not to stretch the dough too much.
- Once fully twisted, pinch the remaining ends together.
- Place in prepared pan, tucking ends under if needed.
Tips and Tricks:
This recipe is not hard, but as with most things there are some tips to help make it the best finished product ever!!
Take a minute and peruse this section. Trust me you will be so glad that you did.
Tip One: Use Pre-Made!
You Can Simplify This Recipe and Not Make a Homemade Chocolate Filling.
Just because you want to make a homemade dish doesn’t mean everything has to be homemade, right?!
Replace the homemade chocolate filling with your favorite chocolate spread. I personally am a Nutella fan. It’s just so good.
Now don’t get me wrong. I love the chocolate filling for this recipe, but sometimes I want to change things up a little bit or want to eliminate steps. This is a quick short cut.
Tip Two: Let Dough Rise In The Fridge.
You can let the dough rise at room temp, but for the most optimal conditions, providing the best results is putting the dough in the fridge for 8 hours or so.
This will help ensure that you have dough that is very manageable to work with and sets up correctly.
Tip Three: Make Ahead.
Eat Babka Within A Day Or Freeze It.
For the best Babka eating experience you want to eat it within the first day of making it. After a day it begins to dry out.
Don’t be saddened by this. You can always freeze Chocolate Babka if you aren’t ready to eat it within a day. It is totally a freezable dish!
Tip Four: Get the Temperature Right.
Chocolate Filling Should Be Warm, Not Hot or Cold.
If chocolate filling has a chance to cool, it will become firm and not in an optimal condition to work with.
If this happens, just simply reheat it in the microwave, being cautious of not letting it get too hot.
We want a warm chocolate filling, not a hot one. Hot chocolate filling can lead to melting or over-softening of the bread dough. No thank you.
Tip Five: Change it up!
Customize Filling For A Sweeter Or Less Sweet Chocolate Babka.
Top the filling off with some chocolate chips for a little extra sweetness and pizazz. Or, don’t do this added step if you want a little less sweetness.
Another extra dimension of goodness can be provided by adding about 1 tsp or less of cinnamon to the filling.
Definitely Use The Sugar Syrup.
Not only is this sugar syrup a great companion to this Chocolate Babka and adds a little sheen to the dessert, which is very pretty, it also helps the Babka to stay fresh for a longer period of time.
Variations
Options For The Sugar Syrup.
For this sugar syrup I used juice. However, you can eliminate the orange flavor and use milk or water to make a basic sugar syrup.
You Can Use Dry Yeast Or Instant For This Recipe.
The recipe calls for instant yeast, but you don’t have to use it. Dry yeast will work just fine too.
You don’t have to add any additional steps to use dry yeast either. Because of the high sugar amounts in the dough, you can use it without proofing. But if you want to be certain, proof your yeast for a few minutes.
Plan Ahead.
Remember the dough takes awhile to set up. So think ahead of time when you want to actually have the Babka ready.
What To Serve With Babka:
Eat Chocolate Babka on its own for a delectable dessert, mid afternoon snack, or exciting breakfast treat. It’s always a great time for a slice of some Chocolate Babka.
However, you can also add some greatness to your Chocolate Babka with serving it with a decadent hot chocolate, some ice cream or use it as a side to a savory breakfast.
There are so many ways to enjoy this treat.
What To Serve With Babka:
- Acai Bowl– My personal favorite site. A little healthy. A little indulgent.
- Chocolate Chaud— French Hot Chocolate
- A Glass of Milk
- Homemade Bag Ice Cream
- Serve as a Side to a Hearty Breakfast like Roasted Veggie Omelets
- Pina Colada Smoothie Bowl
Don’t Miss Out On This Amazing Sweet Bread!
Chocolate Babka is a mouth watering, crave worthy sweet bread that is topped with a citrusy orange syrup, and is loaded with swirls of decadent, rich chocolate filling. This sweet bread is a must have. Don’t miss out!
Other Sweet Breads To Try:

Chocolate Babka
Ingredients
For the dough:
- 3¾ cups all-purpose flour plus extra for dusting*
- ½ cup granulated sugar
- 1 tablespoon instant yeast
- Grated zest of 1 small orange divided
- Grated zest of 1 small lemon divided
- 3 large eggs
- ½ cup milk
- ¾ teaspoon salt
- ⅔ cup unsalted butter at room temperature, cut into small cubes
For the chocolate filling:
- ½ cup powdered sugar
- ⅓ cup unsweetened cocoa powder
- 4 ounces dark chocolate melted*
- ½ cup unsalted butter melted
For the sugar syrup:
- ½ cup fresh orange juice
- ½ cup granulated sugar
Instructions
Making the dough:
- In the bowl of a stand mixer, using a dough hook, combine flour, sugar, yeast, half the orange zest and half the lemon zest. Reserve the other half of the orange and lemon zests for the filling.
- While mixing on medium speed, add milk, and add eggs to the dough one at a time. Continue to mix until dough combines, about 2-3 minutes.
- After dough combines, add salt, and then add the butter a few cubes at a time, mixing until incorporated.
- Once incorporated, knead the dough on medium speed for 10 minutes. After the 10 minutes dough should be completely smooth, elastic, shiny, and pulls away from the sides of the bowl. If this consistency is not achieved, continue to mix until it is. You may need to scrape the sides of the bowl during the mixing time.
- Place dough in a large bowl that is sprayed with non-stick spray, and cover with plastic wrap. Place in refrigerator for 8-12 hours to allow to slow rise. This will also make the dough much easier to work with.
- After the 8-12 hours, grease two 9x4 inch loaf pans with oil and line the bottom of each pan with waxed paper.
- Remove dough from the refrigerator, and divide dough into two equal portions, keep one half covered in the fridge while working with the other half.
Making the filling:
- Chop the chocolate into fine, even sized pieces, and melt in the microwave by heating in 20 second intervals and stirring between.
- Whisk together powdered sugar and cocoa powder, then combine with the melted chocolate, and butter until you have a spreadable paste.
- Stir remaining zest into your chocolate paste, and set aside.
Assemble:
- Lightly flour a surface to roll out the dough on, then roll the dough into a rectangle measuring 15x11 inches.
- Use a spatula to spread half of the chocolate mixture over the rectangle of dough, leaving a ¾ inch border on all sides.
- Then use both hands to roll the dough into a log, starting with the long side. Once rolled, press the seam to seal it to the roll. Use your hands to even out the ends and press them into shape.
- Place seam side down, and then use a sharp knife to cut the roll down the center lengthwise, dividing the log into two long even halves. You should be able to see the layers of the dough and filling.
- With the cut sides facing up, it is time to braid the dough. Do this by gently pinching one end of each piece together, then twisting the two pieces around each other, so you end up with a twist with the chocolate side exposed. Once twisted, pinch the remaining ends together. While twisting, be careful not to stretch the dough too much.
- Once your twist is complete, carefully place it into your prepared loaf pan.
- Cover the pan loosely with plastic wrap and leave to rise in a warm place for 1 to 1½ hours.
- Repeat the process with the remaining dough and filling to make a second loaf.
Bake:
- Preheat oven to 375°F with rack in the middle of the oven.
- Once the oven is fully heated, remove plastic wrap and place loaves in the oven to bake for about 25-30 minutes, until a skewer inserted into the center comes out clean with no dough attached.
Syrup:
- While the cakes are in the oven, heat orange juice in a small saucepan over medium heat, and stir in sugar. Bring to a boil, and stir continuously until sugar dissolves.
- Remove from heat and set aside to cool.
- As soon as the cakes come out of the oven, brush the syrup over them, using all of i t between the two pans.
- Let pans cool completely before serving.
Notes
Babka will stay fresh for 24 hours in an airtight container at room temperature. Don’t place in the fridge.
Babka freezes well for up to 2 months. To thaw, leave on counter or overnight in the fridge. This recipe was adapted from the Sababa cookbook written by Adeena Sussman and from this recipe from Food and Wine.
Nutrition
Our recipe card software calculates these nutrition facts based on averages for the above ingredients, different brands, and quality of produce/meats may have different nutritional information, always calculate your own based on the specific products you use in order to achieve accurate macros for this recipe.
Pin to your baking board:

Stephanie says
This was amazing and unlike any bread I’ve ever eaten! Definitely making this again!
Katie says
This is almost too pretty to eat! Such a gorgeous loaf! Can’t wait to make it!
Beth Pierce says
Oh my goodness this looks so delicious! I can’t wait to try this.